Dolce and Gabriella

Little thoughts from the Big Apple


8 Comments

Happy days

I love July. It makes me feel gloriously stuck in the middle of summer. It makes me feel like I have time, like I have enough long nights and hot days to last as long as I need. It makes me feel like school and winter are still far away.

The end of July always makes me sad. It was a lot worse when I lived in Wisconsin, where sometimes in the winter we get zero hours of direct sunlight and the temperature never makes it out of the negative degrees. My mood has done a 180 since leaving bad weather behind–I no longer have to sit in front of a blue light for fifteen minutes a day to feel normal. That’s something, right? And I love USC, so most of the things that make me sad about August 1st are gone. But I still get leftover bummer feelings every year when I realize July is over.

It’s so easy to be happy without even realizing it, and then the happy time passes and you realize you didn’t savor what you had. I try to savor. I take a lot of pictures. They’re not good or artistic; they’re not even well-lit most of the time. But at least I have them so that when I feel a little blue, I can look at some of the sliver-thin moments of bliss that fly by without me remembering, or worse, noticing. Each photo represents some little “awake” minute in which I was cognizant enough of how good I had it right then to record it for later.


photo 5 The time we bit off much more than we could sip at Serendipity 3

Processed with VSCOcamThe time I took a letterpress printing class and the character palette on Adobe Illustrator came to life around me (so much type!)

photo 2The time the curls held (it had never happened before and hasn’t happened since)

photo 4The time I discovered one of my favorite pieces of art on the wall in front of me (“Between Earth and Heaven” by El Anatsui at the Met)

photo 1The time birthday cake, The West Wing, and a cuddle were all it took to make me the happiest girl around

photo 2The time we were the last ones up

photo 3The time the sky turned pink (those are white roses)

photo 5The time we hung out all day

photo 2The time I saw my school on Netflix (The Graduate

Processed with VSCOcam with f2 presetThe time I spent a grand total of $2 on my favorite meal

Unedited, blurry, happy.

What was the best day of your July? I want to hear what made you this happy.


8 Comments

College the 80/20 Way: Make the Most of Your Time Studying and Socializing

Have you heard of the 80/20 principle? It’s an old economics idea that’s been recently popularized by a guy named Richard Koch. Koch wrote a book in 1999 called The 80/20 Principle: The Secret to Achieving More with Less, which outlines some of the major ways that the 80/20 Principle influences our lives. I read it a few weeks ago and have been fascinated with “80/20 thinking” ever since.

Koch’s big point is that the relationship between cause and effect is not as direct as you’d think. In most situations in our lives, a small minority of causes produces the majority of effects. For instance, 20% of the salespeople at a store usually make around 80% of that store’s total sales. We wear our favorite 20% of our clothes around 80% of the time. Around 80% of the work you get done happens in 20% of the time you spend on it (thanks, Facebook.) The exact relationships vary, obviously, but it’s surprising how many imbalanced cause-effect relationships fall right around the 80/20 range.

Koch says, get rid of the idea that putting in X amount of work will get you X results. X work might get you 4X results, if what you’re doing is really efficient. Or it could get you .2X results if you’re not using your time wisely. Maybe you’ve experienced this while writing an essay (or a blog post.) You struggle with words for ages and not much good is coming out…and then, in a burst of inspiration, you bust out four paragraphs in 20 minutes and feel like a rockstar. In a small percentage of the time you put in, you accomplish most of your success. The key to being more productive at everything, then, is figuring out how to milk those rockstar moments for all they’re worth, while cutting out the time you waste getting zip done.

Although Koch’s book, particularly the first part, is a good read, the big takeaway can be summed up easily as I did above. The more interesting thing to do is take the 80/20 concept and apply it to your own life. So, I started thinking about college: I could have really benefitted from this 80/20 stuff my freshman year. When so many people and assignments and opportunities are thrown at you at once, it can be really stressful and overwhelming. Luckily, you can apply the 80/20 principle to get the most out of your time.

80-20-01


1. Choose depth over breadth when it comes to activities.

This isn’t high school. You no longer need thirteen thousand items on your resume to make it into Dartmouth. The things you do outside of class aren’t for padding an application, they’re to help you grow. The large majority of learning and satisfaction that you derive from extracurriculars will come from the small minority of opportunities that you deeply invest yourself in. So don’t waste time juggling ten clubs. Instead, find one to three that really speak to you and give them your all.

2. Prioritize your perfectionism.

You can do a satisfactory, probably even pretty good job in 20% of the time you spend on a big project. It’s when you say, “oh! And I can do this too…” or, “but it’s not COMPLETELY 110% done yet…” that things start to go haywire. “It is the inclusion of the ‘nice to have’ features that turn potentially sound projects into looming catastrophes,” says Koch, meaning that it’s easy to blow tons of time on little odds and ends of an assignment that, while nice, aren’t worth the time you’re spending on them.

There are certain projects–ones that have big implications on your grade, your career, or your success in some other way–that are absolutely worth being a perfectionist about. But–you guessed it–a small number of projects carry a huge amount of weight in life. This is true in college classes, where an essay can be worth half of your grade, and in most other areas as well. You can’t possibly give every single thing on your to-do list the star treatment, so you need to be smart about which tasks deserve your heart and soul and which you ain’t got time for. Regarding projects that aren’t really going to give you much in the long run, it’s okay to do a satisfactory (80%) job in a small amount of time (20%) and then move on to something else that’s worth your attention.

Not everything can be, or should be, done perfectly. That’s hard for a lot of overachievers, myself included, to swallow.


3. Try working by time rather than by task.

You’d be amazed at how much of the work you do can be accomplished in so little of the time you usually give it. On a particularly busy night, try giving yourself time slots to work on assignments instead of diving into one and only moving onto the next when the first one is complete. For instance, work on three tasks for only an hour each. Having a deadline can really boost productivity, so you might be surprised by how much you accomplish in just the hour. Even if you don’t finish, at least you know which assignment needs the most additional work and how you can best spend your remaining time. You’ll make significant progress on all of your tasks instead of finishing one and ignoring the others (my biggest studying issue.)

4. Selectively socialize.

The second half of Koch’s book, where he talks about how to apply 80/20 thinking to social situations, gets a little confusing. But the basic 80/20 concept definitely applies to college social life. From how it looks in the movies, you’d think every night at college is a party. For some people, it is. But the truth is, to get good grades, to really learn and grow in the way you’re supposed to in college, you have to work a lot. You’re going to have to say no to some invitations.

When I think back on my freshman year, I can count the “wow, that was a really great day/night” moments with my friends on both my hands. The large majority of the happiness I got from socializing came from a minority of the time I spent doing it (and, it’s worth mentioning, the majority of those great moments happened with a very small group of people.) When you’re busy with other stuff, you’ve got to prioritize if you want to feel fulfilled socially. Only say yes to the stuff that actually sounds like a good time (and people you actually like.) Life’s too short for lame-o parties, you feel?

5. Put out the right fires.

80% of all your problems can be solved by fixing the peskiest 20% of the issues causing them. If you feel down in the dumps around February (everyone does), take a good look at your situation and figure out what’s causing the most trouble. That history class is super-stressing you out? Make an appointment with your TA and clear things up once and for all. That guy you got involved with is causing way too much drama? Buh-bye. Even if you can’t fix everything that’s going wrong, fixing the few things that are causing the most issues will make a huge difference.

6. Build on your best 20%. 

Koch’s mantra: run with what works, ditch what doesn’t. Don’t be afraid to abandon things that are “just fine” to dive into something else that you’ve fallen in love with or are really good at. Figure out what your top-20-percent activities are and give them the time/energy/resources they need to be the very best for you…even if doing so means taking resources away from stuff that maybe “you technically should” be doing. Cut out the least productive/satisfying activities you do–YouTube, a boring club, a useless assignment–and give that time to the things that are giving you the most success. Your overall productivity and happiness will multiply.


Have you read the 80/20 principle? Do you have any tips I missed?


15 Comments

In the Know with G & Do

I’ve been wondering since I started this blog if I should do a regular roundup of other web pages I find interesting. On one hand, I’m reluctant to add another “weekly links” series to the blogosphere. Since the style/lifestyle blog market is already so saturated, I’m really trying to limit my posting of the types of content you see in lots of other places. I figure that since so many other people do “Five Things” or “favorite links” type posts, I have a limited ability there to make an impact or establish myself as a credible voice.

On the other hand, I’m not a specialist in much. Beyond comparing denim washes and choosing typefaces, I don’t have expertise in a lot of the areas that I’d like to include in a blog about my interests. The great thing about being a journalist and/or content creator now is that I no longer have to be a specialist to create a valuable publication. Journalism today is as much–or more–about curating quality content from other places as it is about creating that content myself. Learning how to source and curate content is just as important as learning to write it.

With that long-winded justification in mind, here goes a new series focused on sharing the most interesting ideas I come across within the week. I hope these pieces will give you some food for thought, or at least some talking points for conversations where you’d like to sound more informed than you are (because let’s all be honest here, that’s most conversations). Get in the know with G(abriella) and Do(lce) below (haaaaa get it?? I rhyme??)

in the know1

Futura forever, photo from Death to the Stock Photo

TO JOIN IN THE CONVERSATION: Everyone’s reading this New Republic article by a former Yale professor denouncing not only the Ivy League but the entire “elite” educational system. Tl;dr: the pressure to construct the perfect resume and college application is euthanizing the souls of America’s youth. We’ve constructed an oppressive, race/class/gender-biased educational system that makes social mobility beyond difficult and discourages the pursuit of true learning and personal growth in high school and college.

Reactions to the article are divided. Some dismiss the polemical tone of the article as, in my friend Michael’s words, “butthurt.” Carly Heitlinger over at The College Prepster pointed out that the author “definitely has an agenda.” While that’s true, many of his points resound with my own observations and frustrations with the college application process. As a scholarship student at an elite private school, I witnessed the SAT-coaching, resume-padding fervor at its highest level…and, to be quite honest, hated what I saw. That’ll be its own post someday.

TO JOIN IN THE FUN: The Internet is having a great time making fun of my woman crush Blake Lively’s new shopping website, Preserve. This article by Erin Gloria Ryan at Jezebel with a hilarious and optimistic twist on the situation sums up the best, most scathing critiques.

@SamuelAAdams, twitter

A shot from Preserve.us (are we supposed to read that phonetically?) Twitter, @SamuelAAdams.

TO MAKE LIFE A LITTLE EASIER: I love lists in every form. The queen bee of lists, in my book, is the to-do list. Here, the Huffington Post gives six great pointers to make every day’s list more effective.

TO LEARN SOMETHING NEW: See this incredible video I found on my Twitter feed today about the history of typography. In five minutes of adorable stop-motion, The Atlantic’s Ben Barrett-Forrest teaches typography fundamentals and introduces the world’s most influential fonts. Think of this video like chia seeds: a small part of your daily Internet diet packed with nutritious information.

TO WIN BIG: Make a Pinterest board full of color inspiration and submit it to Rescue Beauty Lounge for a chance to co-create a custom nail polish color with “polish mixologist” Ji Baek. Manicure addicts, this is your chance to make a dream come true.

@vincent_vella twitter

How cool is this example of Adam Harvey’s CV Dazzle? Twitter, @vincent_vella.

TO SOUND EDGY TO THAT HIPSTER: Mention this story by The Atlantic‘s Robinson Meyer about his attempt to camouflage his face from facial recognition software. He used a special technique called, wonderfully, “computer vision dazzle,” or “CV dazzle” for short. Invented by designer Adam Harvey while studying at NYU, CV dazzle uses avant-garde hair and makeup styling to mess up the way computers are able to read and identify the contours of the face. Props for looking awesome and being called “dazzle.”

TO GET INSPIRED: Watch this short video by Citizen Watches. In just over 90 seconds, it charts the evolution of the wristwatch, from the tick-tock of the very first one to today’s finest luxury model. The filming is very cool, as director Johan Kramer used a different vintage camera to shoot the scenes from each time period for an authentic retro look. The best part, though, is the saying at the end of each scene: every time a new upgrade for the watch is created, “The End” flashes across the screen. But then in the next scene, something new and even better is discovered. It’s a great reminder that every design is part of a constantly evolving world, and while nothing we create is permanent, every innovation is an important building block toward the next great discovery.


(linked up with: Join the Gossip)


12 Comments

What Would Jared Do?

The latest trend to rock the hair world is the half bun, where you put the top half of your hair in a knot and leave the other half hanging. When the ultra-fashionable editorial assistant at my internship walked into the office with one earlier this summer, I dismissed it as a quirky-cool thing only she could pull off. But lately, a slew of half buns have appeared on Tumblr and Pinterest–every site from Nasty Gal to Byrdie is preaching the virtues of the “baby bun.”

We all know, though, who really started this baby bun thing.

letoPinterest, Alicia Holden.

I’m pretty cautious when it comes to trends, but I think some little part of me has always wanted to be like/be Jared Leto. So, at the risk of looking like a Teletubby, I gave the baby bun a shot.

Processed with VSCOcam with f2 presetAmerican Eagle romper (old), J. Crew Factory sunglasses (other colors on sale), IIIBeca by Joy Gryson bag (which I got for $24 at Beacon’s Closet in New York)

Processed with VSCOcam with f2 preset

I’m kind of feeling it. My hair is off my face, yet it’s still shielding my neck from the blistering sun (I missed you, sun!)

For a guaranteed improvement on your current afternoon, ogle some more glorious man buns here here and here. Apparently there’s a fervent group of man bun worshippers on Pinterest. And let’s all thank Jared Leto again for bringing this perplexingly attractive hairstyle into the public eye, although according to The New York Times, it’s been around in Brooklyn since 2012. Obviously.

Would you wear a baby bun?

(Linked up to Style Elixir, All Things Chic, Two Thirty Five Designs, Watch out for the Woestmans, Fizz & Frosting, DC In Style, Still Being Molly)


2 Comments

New York Hit List

What better way to conclude my stay in New York than make a list of all my favorite New York things? Before I came, I was desperate for recommendations on where to go. But all I could really find on the subject were lists of places that were way out of my budget. I didn’t necessarily want to avoid the must-see tourist attractions, but I hoped to find some “local” things to do that were a little quieter and, hopefully, less expensive.

It wasn’t easy, but in time I did find some relatively cheap, good places to eat, shop and hang out. The majority of these are centered around the East Village near my apartment. If you’re considering staying in the city for a longer period of time, it’s a great neighborhood for college-age people. There are lots of inexpensive restaurants, especially on St. Marks Place, and it’s a short walk to lots of great shopping in Soho, the West Village, and the Flatiron area.

new york tips

Continue reading


24 Comments

DIY Grown-up Friendship Bracelets

As a kid, I loved making friendship bracelets with my best friend Sarah at sleepovers. She was the bracelet queen and could weave a perfectly knotted, perfectly even strand like no other. I moved away from her when I was seven. Every time I saw her after that, she’d be wearing a stack of new, pretty bracelets and would proudly present me with one of her best creations, which I treasured.

After more than ten years of living in different states and different countries, the bracelet queen and I are still BFFs. This summer, she’s a camp counselor. She posted this status on Facebook last week after attempting to make braided bracelets with her twelve-year-old campers:

I was told today that friendship bracelets “died last year.” So I put away my string and faked a conversation about One Direction for forty-five minutes. #downwiththekids

How devastating is that?! Have friendship bracelets really died?

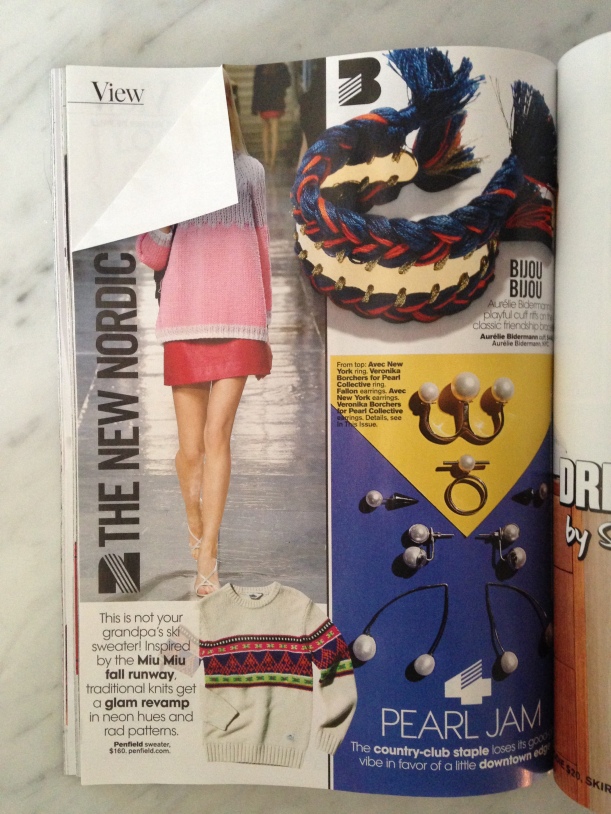
French jewelry designer Aurélie Bidermann doesn’t think so. Her “Copacabana” collection is a fresh, grown-up take on the quintessential friendship bracelet. When I saw one of her works featured in Teen Vogue, I thought it was so cool; that is, until I saw the price. She’s passing off this baby for $440.

photo (11)

as if(Tumblr, ruinedchildhood.)

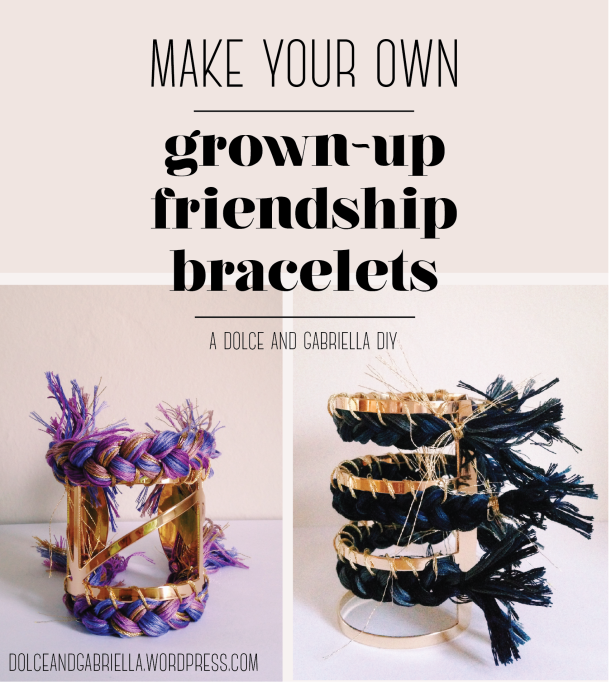
But never fear–where there’s a will and a crapload of embroidery floss, there’s a way. Taking Bidermann’s bracelets as inspiration, I set out to make my own modern friendship bracelets for a fraction of the cost. It was even easier than I expected.

If you’d rather follow along with this tutorial on your phone, I made a Steller story with the same pictures and info.

friendship bracelets pin picPin me, pretty please!

The tutorial is for the purple one on the left, but the one on the right is an easy adaptation. The process isn’t hard at all, and it doesn’t take much time to complete–you can finish a bracelet in three episodes of Scandal on Netflix.

Processed with VSCOcam

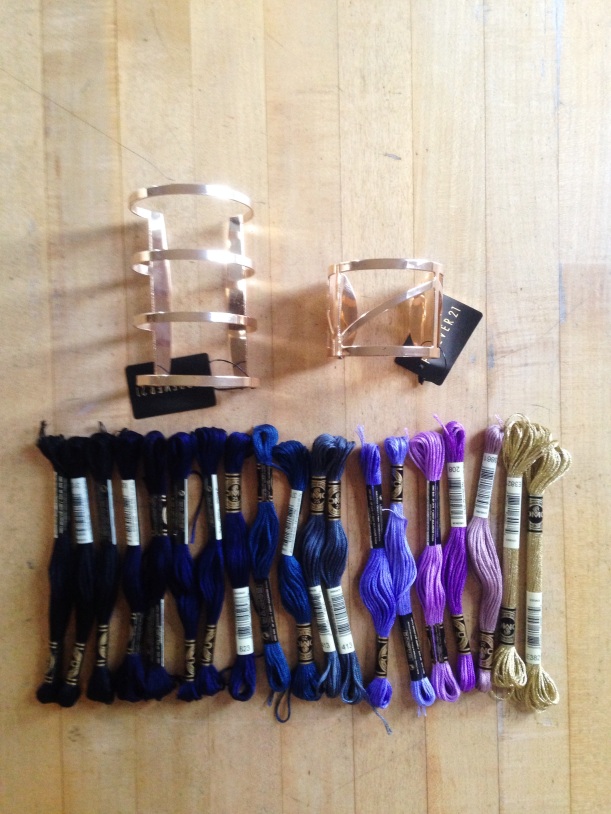
First, get your materials. I went to Forever 21 and bought two basic cuff bracelets. The one on the right was $4.80 and the larger one on the left, $7.80. Look for a cuff that has thin bands of metal on the top and bottom around which you can loop the braids. Then, head to a craft store and pick up some embroidery floss. I’d buy three little bundles for each braid you want to do–I got 6 bundles for the purple bracelet and 9 for the blue–plus one extra for tying the braids to the cuff (I suggest gold.) For a Bidermann-inspired look, pick out colors that are in the same family but not identical. The purple bracelet is a mix of periwinkles and violets plus a few gold strands, and the blue is black, navy, slate blue, and charcoal grey. You’ll also need scissors, tape, a straight pin or needle and some clear nail polish.

Processed with VSCOcam

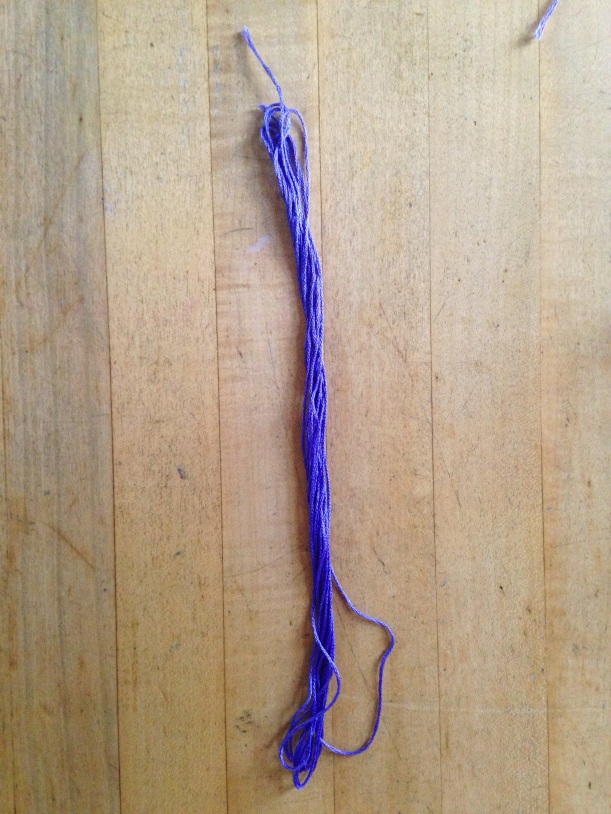
Open each little bundle of floss and unwind it, cutting it roughly in half. (This is so each of the two braids will have an equal mix of all the colors.) Then re-bundle each half, winding it around your fingers or a piece of cardboard, into new bundles that are about ten inches long (or, the distance around your cuff plus two inches of overhang on each side.) If the floss doesn’t stop perfectly at one end of the bundle, cut off the remainder. Repeat with all the bundles, then gather half of your new bundles (one of each color) into a big bundle.

Processed with VSCOcam

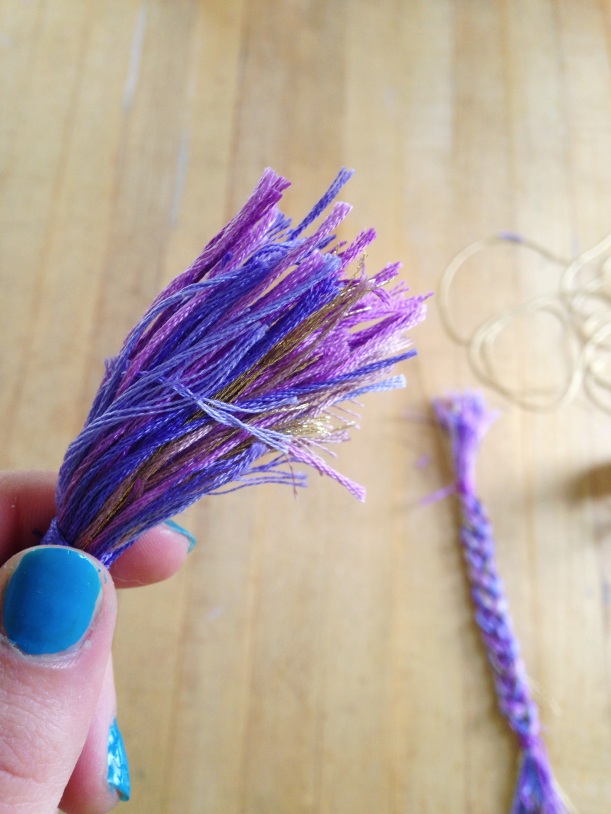
About two inches down the new big bundle, tie all the strings together tightly with a scrap piece of floss. Then, snip the loops on both ends of the bundle.

Processed with VSCOcam

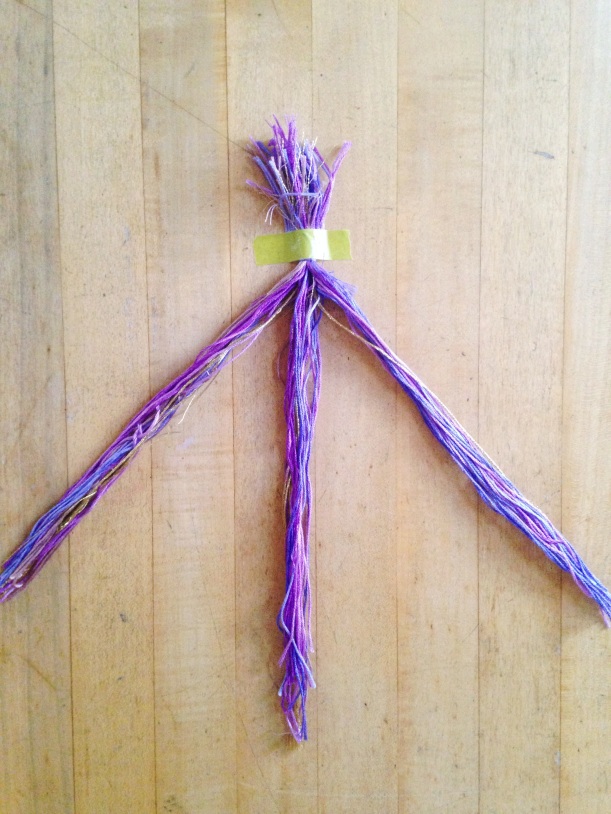
Tape your bundle down to a table just above the tie and divide the strings into three sections, making sure that the colors are divided evenly between each section. Braid. The braid should be tight enough that the plaits are uniform, but loose enough that each section is kind of fluffed out and plump, if that makes sense. Stop braiding about two inches from the end and tie the braid with another scrap piece of floss. The braid should be the length around the cuff from one edge to the other.

Processed with VSCOcam

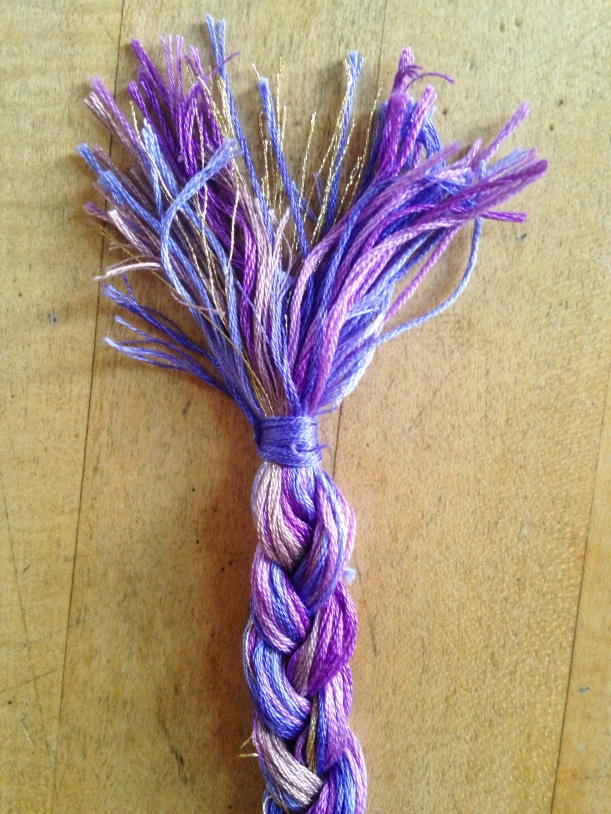
At both ends of the braid, wrap a scrap piece of floss around the original tie. Leave a 1.5-inch tail at the beginning of the wrap and stop with 1.5 inches of floss left so that you can tie the ends together.

Repeat all these steps to make another braid with the remaining floss.

Processed with VSCOcam

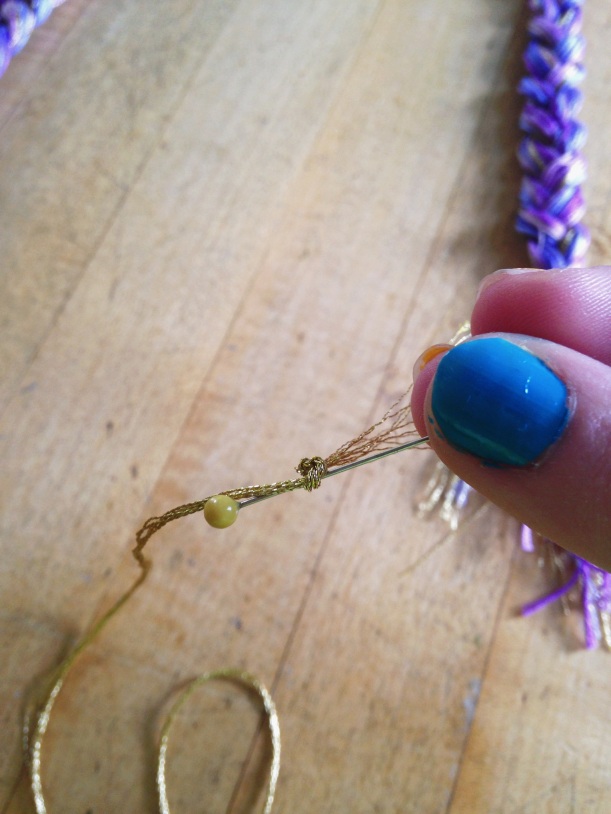
Cut a piece of gold floss about two feet long. If you have a needle with a large eye, use that for these next steps. If not, MacGyver yourself a needle like I did with a straight pin: tie a big knot in the end of the floss and stick the pin through the knot.

Processed with VSCOcam

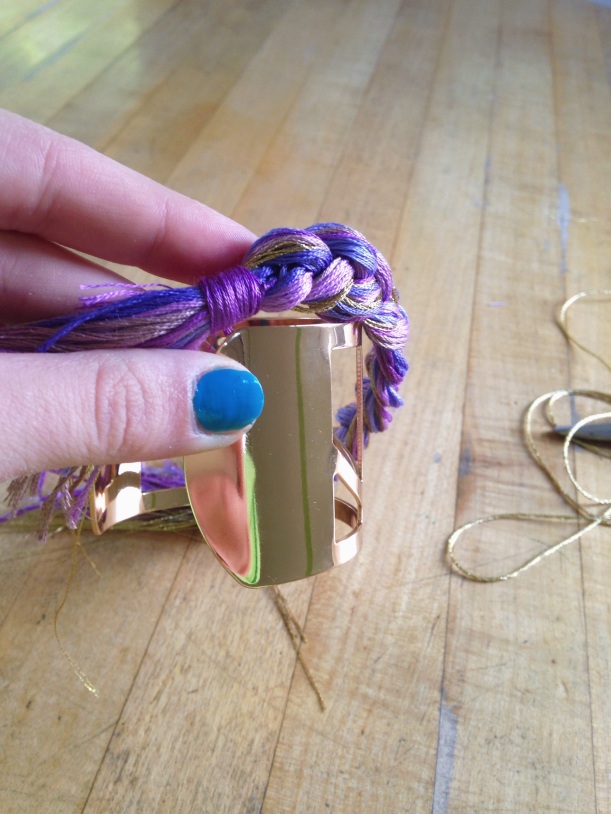
Line up the end of your first braid with the edge of the cuff. Starting from the inside of the cuff/backside of the braid, insert the needle/pin (I’m just going to say “pin” from now on) in between two strands of the braid and carefully push it through, pulling the floss through the braid. Wind the floss around the cuff and then up the back of the braid. Stop pulling when there’s about three inches of floss left and tie the pin-end and the three inch-end in a knot around the cuff, securing the braid to the cuff.

Processed with VSCOcam

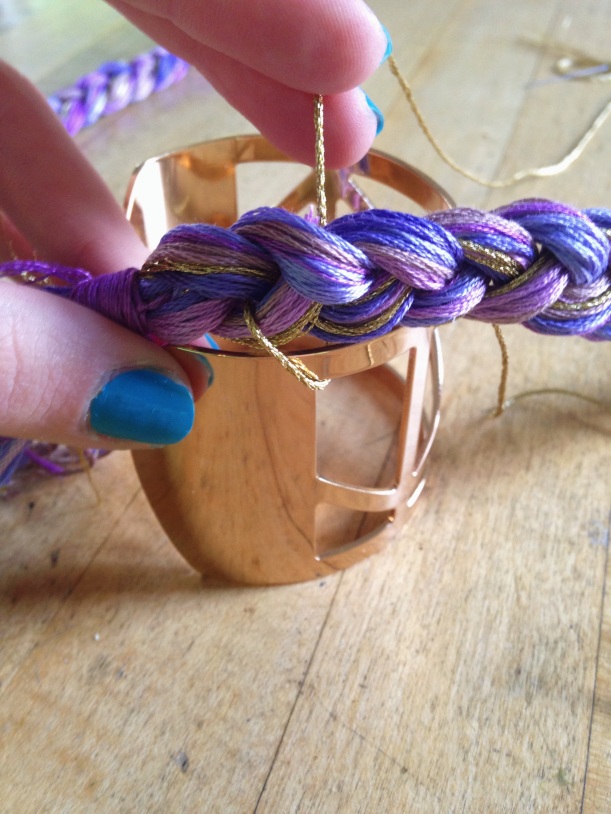
Continue using the pin to wrap the gold floss through the braid, around the cuff and up the back. To keep your wrapping consistent, always go through the braid at the same point (for instance, where the left strand crosses over the middle strand.) When sticking the pin through the braid, take care to thread the floss through an “empty spot” in between two strands of the braid. If you try to go through a strand instead, you could snag other pieces of floss with the pin and mess up the braid.

Processed with VSCOcam

Keep wrapping until you reach the end of your braid and the other end of the cuff. Watch the tension of your wraps–allow enough slack for the braid to stand on top of the cuff, but wrap tightly enough that the braid doesn’t flop down over the cuff.

When you get to the end, thread the remaining floss through the backside of the last loop around the cuff and tie another knot, securing the braid to the cuff on both sides. Cut the excess gold floss.

Flip the cuff over and repeat the process on the other side.

Processed with VSCOcam

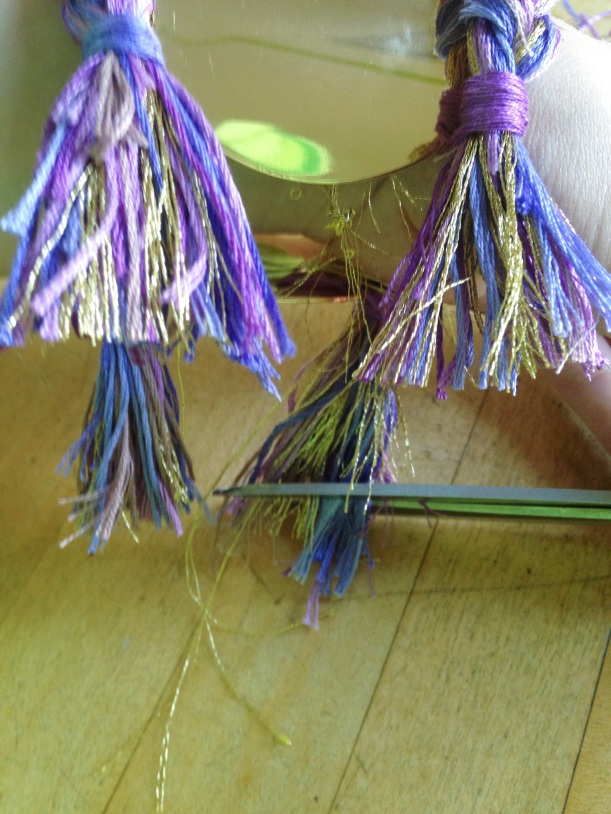
When both braids are done, cut the ends to a uniform blunt length. Use big scissors and do it in one fast chop to get the look of Bidermann’s piece.

The last step is to secure your knots and ends. Dab clear nail polish on all the knots to help them stay in place. If having little ties (from the gold thread and the wraps on the braids) bothers you, you can tape those ends to the inside of the cuff with a piece of Scotch tape. I’d do that instead of trimming the ends short just in case a knot unravels and you have to tie it again.

bracelet 1

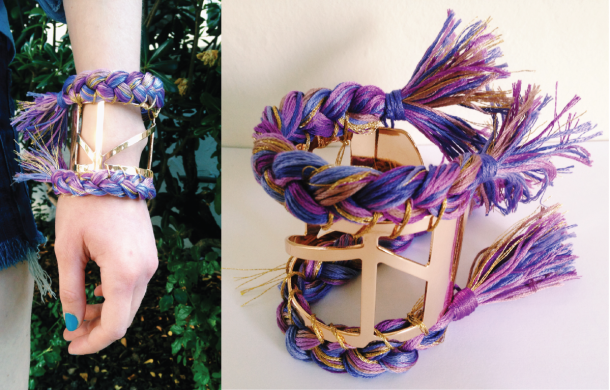
And there you have it–a modern, adult version of the friendship bracelets we all love. For this one, my total costs were under $10…a steal compared to $440 for Bidermann’s version.

bracelet 2-01
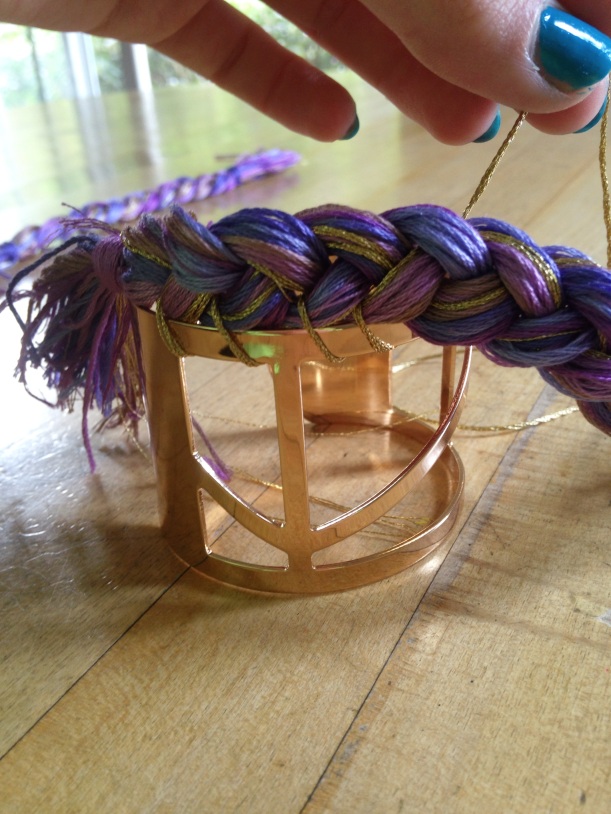
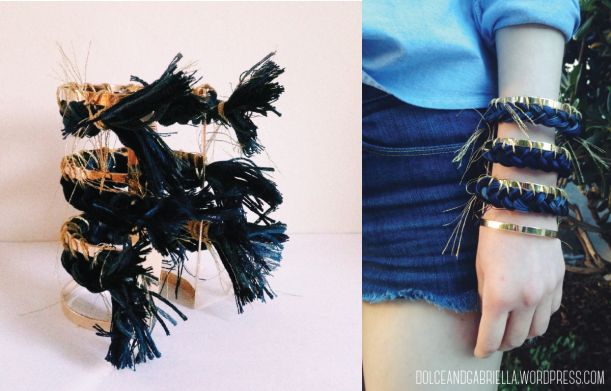
For a different look, buy a taller bangle with multiple rows of metal. The only differences here are the number of braids I used (three) and what I did with the ends of the gold ties (frayed them and left them out instead of hiding them away.) The colors and size make this bracelet a little more edgy than the first, and I love it.

Since they’re easy and relatively cheap to make, make two like I did and send one to your best friend. The purple one is headed off to Sarah’s house as a late birthday present. After all the beautiful friendship bracelets she’s made for me over the years, I’m glad I finally have one to share with her.

Enjoy your Sunday, friends! Wishing you lots of coffee and a long walk outside after dinner.


Have you ever made a copycat version of something you couldn’t afford? I want to know how you did it!

(linked up to: Skip to My Lou, Join the Gossip, I Have a Degree in This, Still Being Molly, DC In Style, Fizz & Frosting, Walking in Memphis in High Heels, Style Elixir, Funky Polkadot Giraffe, New Nostalgia, Ladybug Blessings, Coastal Charm, Simply Just Lovely, My Romantic Home, The Shabby Nest, Chic on a Shoestring)


7 Comments

Easy Peasy Lemon Squeezy

Since moving to California I’ve become obsessed with flavored water (which Californians call, in typical California style, “spa water.”) USC even sets it out in the dining hall. It’s as fun to drink as juice or soda with none of the sugar, and it has the health benefits of regular water. I get really bad headaches when I’m dehydrated, but water gets boring after a while…when that happens to you, make like a Californian and stick some fruit in it!

I usually just put some lemon slices in my water bottle and call it a day, but after seeing several pins on Pinterest about lemon-cucumber-mint water, I decided to give it a shot. See what I did here on Steller:

https://steller.co/stories/296209253574641387

Screen Shot 2014-07-17 at 9.44.27 AM


For a gallon of water, this pin suggests slicing up three lemons (I only did two) and half a cucumber. Put them in a pitcher with some fresh mint leaves (found in the produce section by the rest of the herbs for around $2 per bundle) and fill it to the top with water. Cover and let the water steep in the fridge overnight…then enjoy a big glass of supercharged H2O in the morning!

All three add-ins are really good for you, too. Lemons contain antioxidants and Vitamin C, and they help flush excess fluids out of your body, i.e. water weight. Cucumbers are great for hydration–that’s why people put them on their eyes–and are full of vitamin C, vitamin K, and potassium. And mint aids in digestion and can also help with nausea (I drink mint tea when I’m feeling sick.)

Drinking a big glass of water first thing in the morning is a really easy way to feel healthy and energized for the day ahead. Especially because I’m not always good about drinking as much water as I need to, a burst of hydration in the morning feels great for hours after. Play around with what you put in–some of my other favorites are strawberries, oranges, and pineapple.


What’s your super-easy health secret? I want to know!